组件✅
构建组件的方式有哪些?
答案
| 类型 | 用法 | 适说明 |
|---|---|---|
| 函数组件 | function MyComp(props) { ... } | 推荐主流写法,配合 Hooks |
| 类组件 | class MyComp extends React.Component | 需要完整生命周期、复杂逻辑 |
| 类组件继承 PureComponent | class MyComp extends React.PureComponent | 优化了性能,避免会做浅比对,相同就不会渲染 |
| 高阶组件(HOC) | withXXX(WrappedComp) | 逻辑复用、权限、日志等增强 |
| 函数作为子组件 | <Comp>{fn => ...}</Comp> | Render Props,灵活渲染 |
| React.cloneElement | React.cloneElement(child, props) | 动态增强/注入子元素 |
| React.createElement | React.createElement(type, props, ...) | JSX 底层实现,动态创建元素 |
补充说明
- 实际开发优先推荐函数组件+Hooks,HOC/cloneElement等用于特殊增强场景。
- createElement 通常由 JSX 自动调用,手写较少。
如需灵活复用渲染逻辑,优先考虑 Render Props 或 HOC。
延伸阅读
类组件继承 Component 和 PureComponent 有什么区别?
答案
PureComponent 源码 相比 Component 在原型上多了一个 pureComponentPrototype.isPureReactComponent = true; 用来标识为纯类组件。
然后在更新检查时,如果判断为纯组件,会对属性和状态进行浅比较,如果相同则不触发更新。具体代码
function checkShouldComponentUpdate () {
  // ...
  if (ctor.prototype && ctor.prototype.isPureReactComponent) {
    return (
      !shallowEqual(oldProps, newProps) || !shallowEqual(oldState, newState)
    )
  }
}
注意浅比较内部采用的是 shallowEqual 方法,核心逻辑如下
//  true 相同,即使是引用不同,因为浅层值都是原始值,且值相同,不会触发更新,
shallowEqual({ a: 1 }, { a: 1 })

// false 不同,因为浅层值中 a 对应的不是同一个引用对象即使值没有变化,会触发更新,
shallowEqual({ a: { b: 1 } }, { a: { b: 1 } })

const a = { a: 1, c: { b: 2 } }
const b = { a: 1, c: a.c }
// true 相同,因为浅层值中所有原始值和引用值都相同,不会触发更新,
shallowEqual(a, b)
这也是为什么在使用 PureComponent 时需要注意不要直接修改引用对象的原因。还有值看起来相等,但也会触发刷新的问题
类组件 和 Function Components 的区别?
答案
| 维度 | 类组件 | 函数组件 | 对比说明 |
|---|---|---|---|
| 编程思想 | 面向对象(OOP) | 函数式 + 声明式 | 函数组件更贴合 React 的核心理念:UI = f(state) |
| 状态管理 | this.state + setState() | useState() | 函数组件语法更简洁,更新逻辑更清晰 |
| 副作用处理 | 多个生命周期函数 | useEffect()、useLayoutEffect() | 函数组件副作用逻辑聚合,更集中 |
| 逻辑复用 | HOC / render props | 自定义 Hook | Hook 更灵活、组合性强,避免嵌套地狱 |
| 代码结构 | 构造器 + 多方法 + this | 单函数 + Hook,无 this | 函数组件更少样板代码,作用域更明确 |
| 性能优化 | shouldComponentUpdate / PureComponent | React.memo / useMemo / useCallback | 函数组件提供更细粒度的性能控制 |
| 官方态度 | 兼容保留,逐渐淡出 | 默认推荐,重点支持 | 文档、生态和新特性均围绕函数组件构建 |
此外函数组件在访问是的是状态的快照,而类组件由于通过 this 访问 prop 和 state, 所以访问的是最新的值。示例如下,更具体的描述详见 How Are Function Components Different from Classes? React 核心开发 dan abramov 讲解函数组件和类组件的核心差异
在组件渲染出来后点击切换状态,查看控制台输出可以看到函数组件输出的是状态切换前的快照,所以为 A, 类组件输出的是最新的状态,所以为 B
受控和非受控组件区别?
答案
参考官方文档 受控和非受控组件
- 受控组件 React 控制元素状态为受控组件
- 非受控组件 不受 react 控制的元素
- 受控组件
- 非受控组件
// 受控组件
function ControlledForm () {
  const [value, setValue] = useState('')
  // react 控制组件的状态
  return (
    <input
      value={value}
      onChange={e => setValue(e.target.value)}
    />
  )
}
// 非受控组件
function UncontrolledForm () {
  const inputRef = useRef()
  return (
    // 原生 input 持有状态,通过 ref 获取值
    <input
      ref={inputRef}
      defaultValue="default"
    />
  )
}
在新版文档里 受控和非受控组件 的概念进一步细化。受控组件是指组件由父级元素控制,而非受控组件是指组件自身控制。
React 有哪些内置组件?
答案
React 有两个核心包
React 相关内置组件
| 组件 | 说明 |
|---|---|
<Fragment>、<> | 实现无根节点的列表渲染 |
<Profiler> | 性能分析组件,记录渲染时间和更新信息 |
<StrictMode> | 严格模式组件,帮助发现潜在问题 |
<Suspense> | 懒加载组件,处理异步加载 |
<Activity> | 实验性质,用于跟踪组件活动状态 |
<ViewTransition> | 实验性质,用于处理视图过渡动画 |
ReactDOM 并未暴露任何内置组件,而是对 DOM 原生组件进行了增强,核心功能如下
| 组件 | 说明 |
|---|---|
div等组件 | 例如 ref 实现获取组件实例,className 实现类名绑定等,事件会被代理为合成事件 |
<form> | action 属性除了 url, 还支持函数形式,提交时会调用函数并传入表单数据 |
<input> | formAction 除了 url 同样支持函数,表单上事件会被代理为合成事件 |
说一下 Suspense 和 lazy 的使用场景?
答案
suspense 用来处理异步加载的组件,通过 fallback 属性指定加载时的占位内容。lazy 用来懒加载组件,只有在需要时才加载通常可以配合 Suspense 使用。
- lazy
- Suspense
一个典型的误区是认为 Suspense 组件针对异步请求加载场景,通过上例可以看出 Suspense 是基于特殊的返回结构来判断加载 callback 还是真实的 children 的。核心使用场景包括
| 使用场景 | 备注 |
|---|---|
React.lazy() 加载组件 | - |
use() + 异步函数 | 在服务端组件 |
| 异步资源手动挂起(抛出 promise) | 模拟异步加载组件 |
延伸阅读
createPortal 了解多少?
答案
说一下 ViewTransition 的使用 ?
答案
延伸阅读
- Add
<ViewTransition>Component issue 说明此组件
组件生命周期
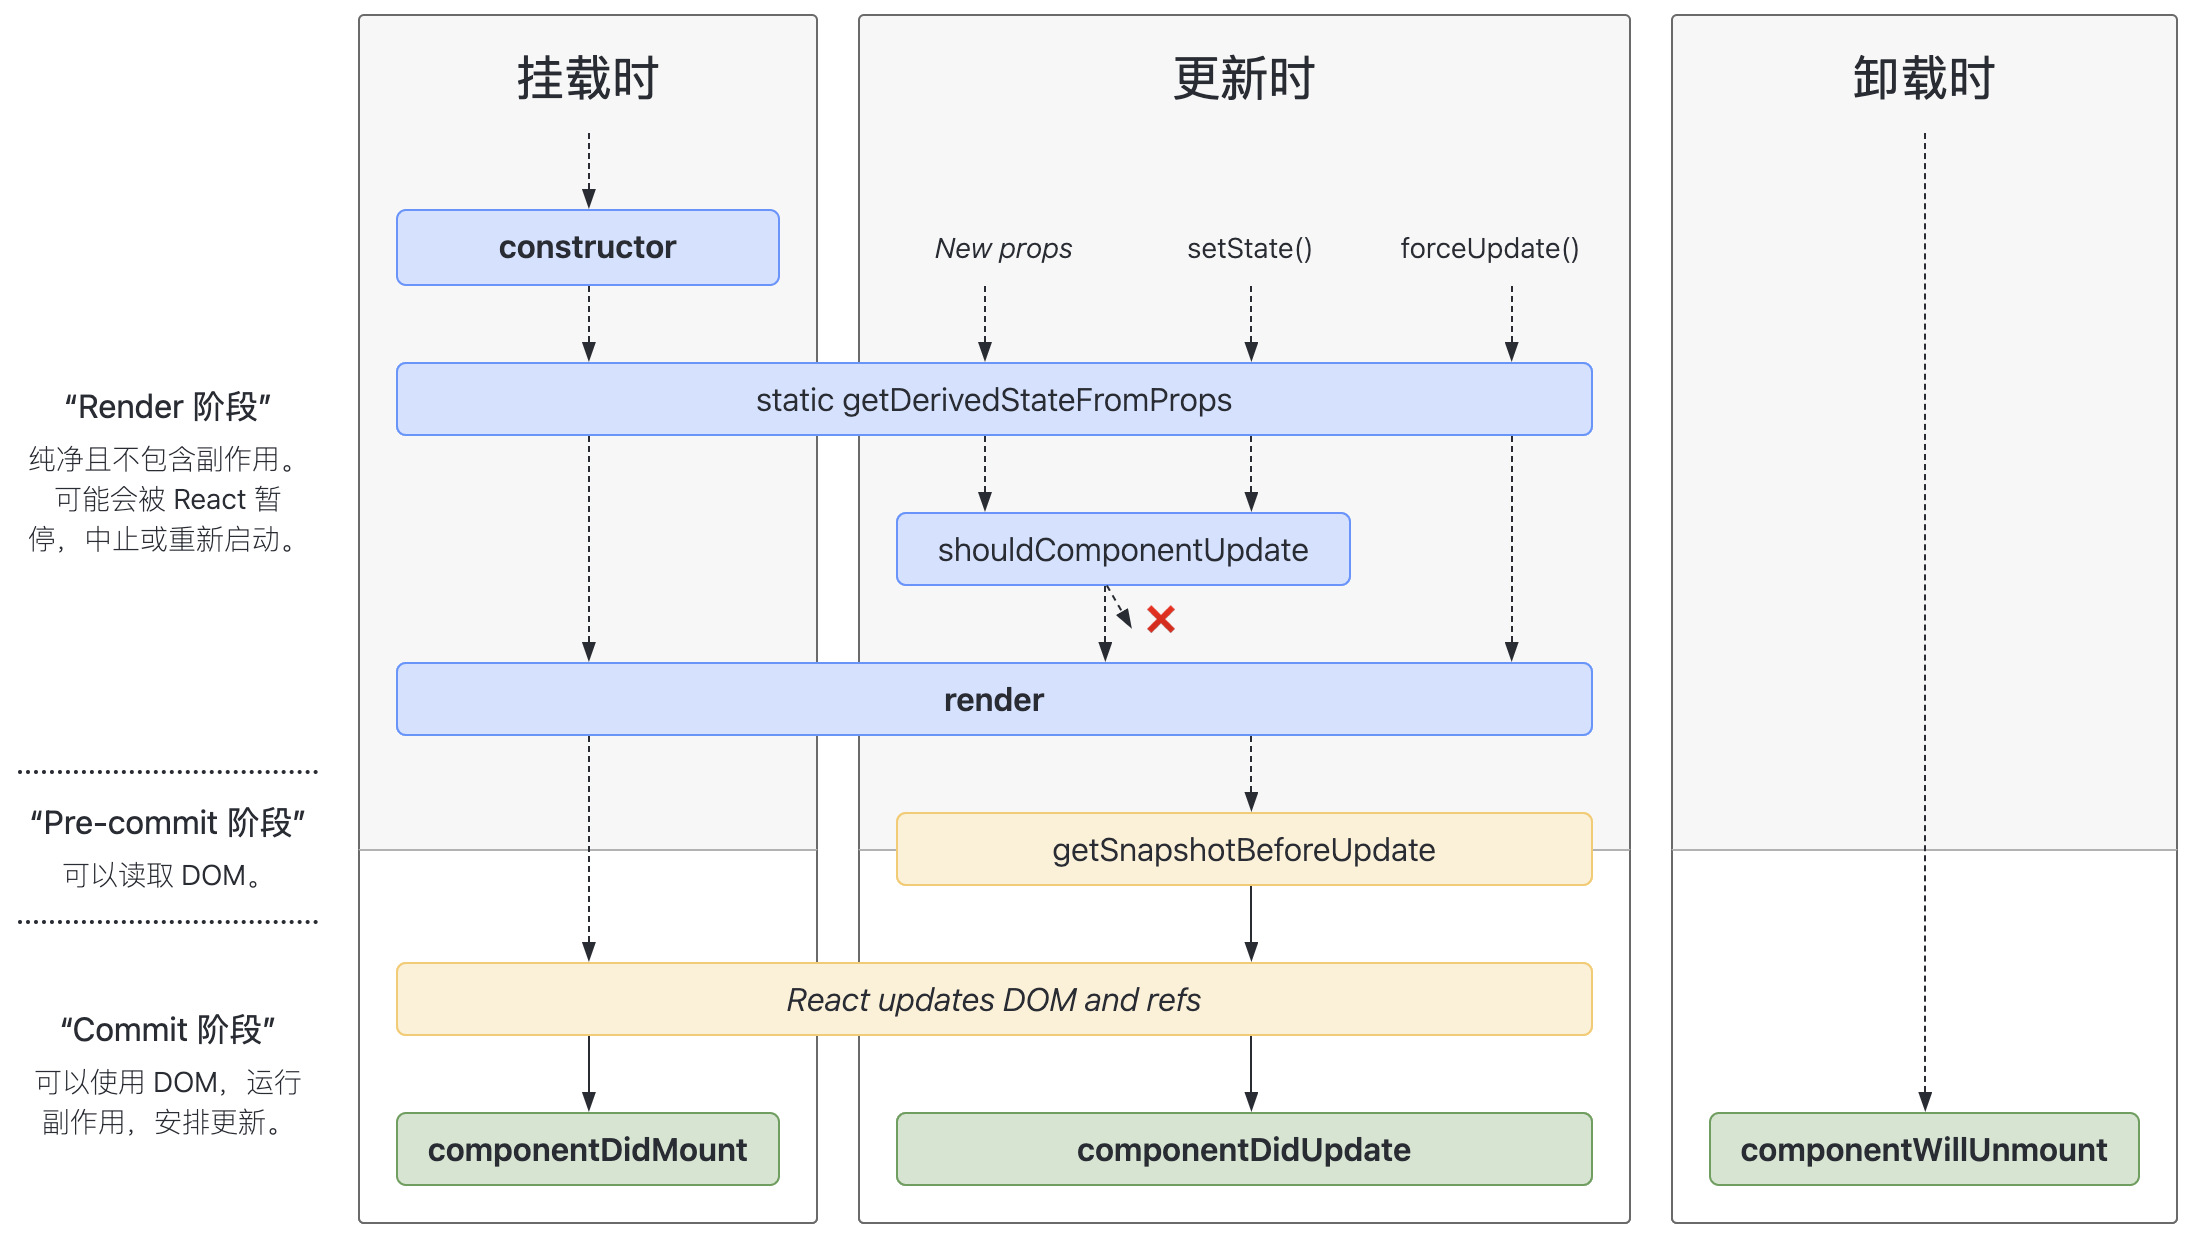
答案
- 挂载阶段(Mounting)
- constructor:组件实例化时执行,用于初始化 state 绑定事件等操作
- getDerivedStateFromProps:在render方法执行之前调用,用于根据props设置state。
- render 渲染组件
- componentDidMount:组件挂载到DOM后执行,用于执行一些需要DOM的操作,如获取数据。
- 更新阶段(Updating)
- getDerivedStateFromProps:在render方法执行之前调用,用于根据props设置state。
- shouldComponentUpdate:判断组件是否需要重新渲染,默认返回true
- render 渲染阶段
- getSnapshotBeforeUpdate:在更新前获取DOM信息,如滚动位置等。
- componentDidUpdate:组件更新后执行,用于执行一些需要DOM的操作,如更新数据。
- 卸载阶段(Unmounting)
- componentWillUnmount:组件卸载前执行,用于清理一些资源,如定时器等。
- 异常流程会触发如下钩子
- getDerivedStateFromError:捕获错误后设置state
- componentDidCatch:处理捕获的错误,比如上报到服务端
此外还废弃了如下钩子
- componentWillMount 挂载前触发,更名为 UNSAFE_componentWillMount
- componentWillReceiveProps props 变化时触发,更名为 UNSAFE_componentWillReceiveProps
- componentWillUpdate 更新前触发,更名为 UNSAFE_componentWillUpdate
对于函数组件, 重点钩子映射如下
- useLayoutEffect ,在 DOM 更新后立即执行,模拟 componentDidMount 和 componentDidUpdate 行为
- useEffect 副作用钩子,每次挂载和更新后都会触发,通过返回的函数来清理副作用模拟
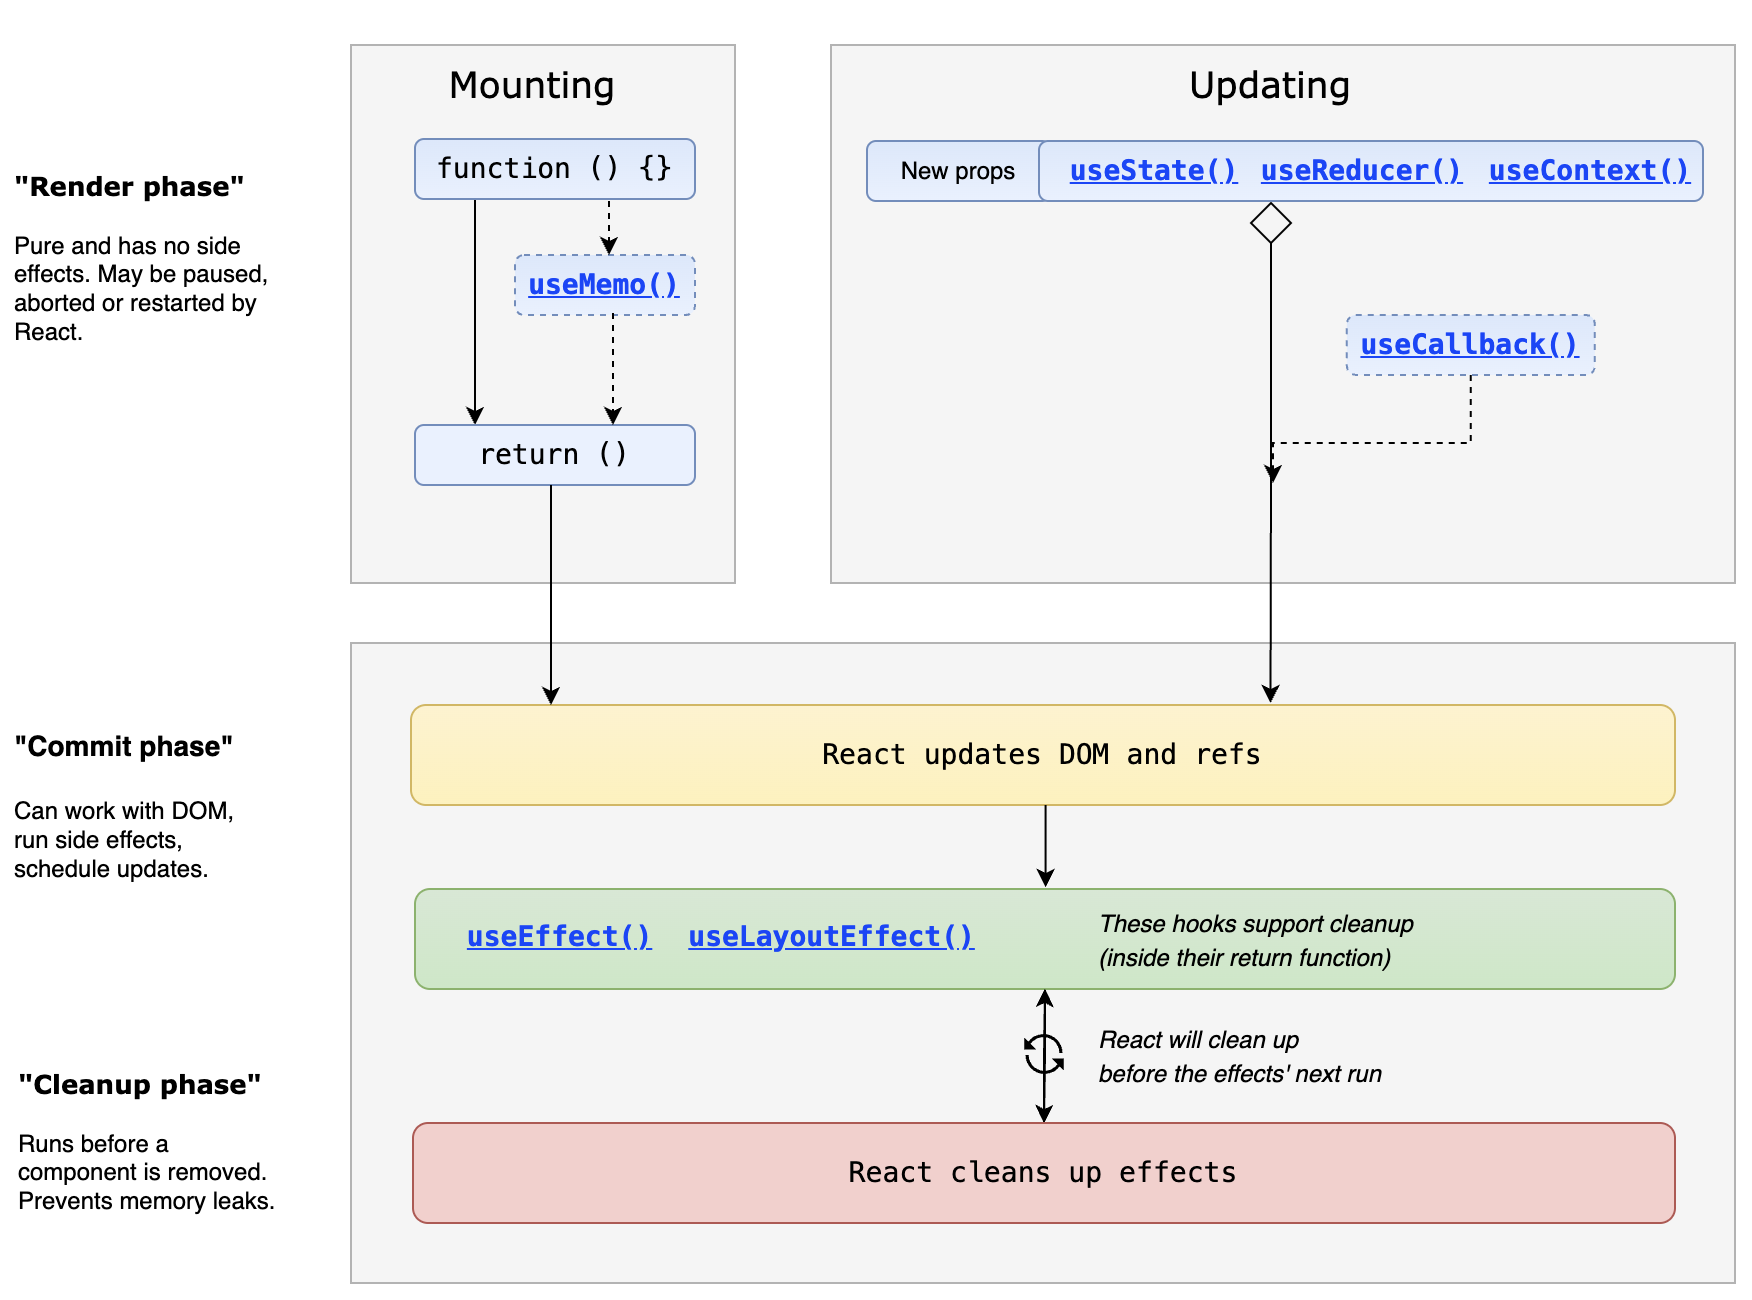
进一步细节参考 react-hook-component-timeline
示例代码
- 类组件生命周期
- 函数组件生命周期
延伸阅读
- Component 官方文档详细讲解类组件生命周期和迁移到函数组件 hooks 的方法
- lifecycle of reactive effects 官方文档详细讲解 useEffect 生命周期
- How do lifecycle methods correspond to Hooks? 官方文档回答如何映射类组件生命周期到函数组件 hooks
父组件如何调用子组件的方法?
答案
父组件调用子组件方法,关键在于获取子组件实例或暴露接口。常见方式如下:
| 场景/方式 | 适用组件类型 | 典型写法/说明 | 优缺点说明 |
|---|---|---|---|
| ref(createRef) | 类组件 | <Sub ref={this.sub} />,this.sub.current.fn() | 简单直观,HOC包裹时失效 |
| ref函数式声明 | 类组件 | <Sub ref={ref => this.sub = ref} /> | 写法简洁,HOC包裹时失效 |
| props onRef | 类组件/HOC | <Sub onRef={node => this.Sub = node} /> | 兼容HOC,需自定义props |
| useImperativeHandle + forwardRef | 函数组件/HOC | useImperativeHandle(ref, () => ({ fn })) | 推荐函数组件,灵活可控 |
代码示例
// 类组件 ref
class Sub extends React.Component {
  callback() { console.log('类组件方法') }
  render() { return <div>子组件</div> }
}
class Super extends React.Component {
  sub = React.createRef()
  handleClick = () => { this.sub.current.callback() }
  render() { return <Sub ref={this.sub} /> }
}

// 函数组件 useImperativeHandle
const Child = React.forwardRef((props, ref) => {
  React.useImperativeHandle(ref, () => ({
    func: () => console.log('函数组件方法')
  }))
  return <div>子组件</div>
})
function Parent() {
  const childRef = React.useRef()
  React.useEffect(() => { childRef.current.func() }, [])
  return <Child ref={childRef} />
}
常见误区
- HOC 包裹的子组件 ref 失效,需用 onRef 或 forwardRef。
- 函数组件不能直接用 ref 访问方法,需配合 useImperativeHandle。
如需兼容 HOC 或函数组件,推荐用 forwardRef + useImperativeHandle 或自定义 onRef props。
延伸阅读
- call-child-method-from-parent stackoverflow 上的讨论
- React 官方文档:Refs
- useImperativeHandle
- forwardRef
react 组件通信方式
答案
默认情况下 react 推荐采用单向数据流,父组件通过 props 向子组件传递数据,子组件通过回调函数向父组件传递数据。除了标准的 props 传递外,还有如下几种方式可以实现组件之间的通信。
- props drilling:通过 props 从父组件传递数据到子组件,逐层传递数据。这种方式简单直接,但是当组件层级较深时,会导致 props 传递过程繁琐和组件耦合度增加。
- context:使用 React 的 context API,可以实现跨层级的数据传递,避免 props drilling 的问题。通过创建 context 对象,可以在组件树中传递数据,任何一个组件都可以访问到这个数据。但是 context 会使组件的复用性降低,因为组件和 context 之间会产生耦合。
- 事件总线:通过事件总线的方式,可以实现任意组件之间的通信。事件总线是一个全局的事件系统,组件可以通过订阅和发布事件来进行通信。但是事件总线会使组件之间的关系变得不明确,不易维护。
- Redux/Mobx:使用状态管理库,如 Redux 或 Mobx,可以实现全局状态管理,任意组件都可以访问和修改全局状态。这种方式适用于大型应用,但是引入了额外的复杂性和学习成本。
本质上组件之间的通信就是信息交换的过程,在脱离框架范式的逻辑上,状态的管理可以不仅局限于内存模式,本地存储、URL、远程都可以作为状态的存储介质。
延伸阅读
- Managing State 官方文档详细讲解组件状态管理
请求在哪个阶段发出,如何取消请求?
答案
- 类组件
- 在
componentDidMount中发起请求,组件挂载后执行。 - 在
componentWillUnmount中取消请求,组件卸载前执行
- 在
- 函数组件
- 在
useEffect中发起请求,组件挂载后执行。 - 在
useEffect的清理函数中取消请求,组件卸载前执行。
- 在
示例代码
jsx 返回 null undefined false true 区别?
答案
在 react 中若返回 null, undefined, false, true 均表示空渲染。逻辑上无区别
有一些误导性的文章会说 false 导致再也不会触发更新而 null 不会,实际上 false 也会触发更新,注意甄别
延伸阅读
- JSX 返回值类型说明 react 返回值说明
- Booleans, Null, and Undefined Are Ignored 官方文档对这四个值的说明
JSX 如何渲染 HTML 注释节点 ?
答案
可以采用 dangerouslySetInnerHTML ,新版文档参见 Dangerously setting the inner HTML
const CommentNode = ({ text }) => {
   return (
      <div
      style={{ display: "none" }}
      dangerouslySetInnerHTML={{ __html: `<!-- ${text} -->` }}
      />
   );
};
React.Children.map 和 props.children 的区别
答案
Children 是用来处理组件子元素的工具类,提供了一些方法来操作和遍历子元素。Children.map 是其中一个方法,用于遍历子元素并对每个子元素执行一个函数。
- Children.map 会自动兼容各种场景,包括单个子元素、多个子元素、数组空等情况,
children.map需自行判断传入的类型做兼容
- Children.map 会自动处理
key属性,而children.map需要手动处理key属性
此外注意虽然结构上是三个子元素但是由于 MoreRows 组件的存在,实际上是两个子元素,可以通过直接传入数组或者渲染属性处理此问题
延伸阅读
- Children 官方文档对 Children 的详细讲解
setState() 是同步还是异步??
答案
注意下列概念只对 react17 之前有效,react18 及以后默认均采用 concurrent 模式,所以 setState 为异步
- setState 只在合成事件和钩子函数中是“异步”的,在原生事件和setTimeout 等非 react 控制的流程中是同步。
- setState 的“异步”并不是说内部由异步代码实现,其实本身执行的过程和代码都是同步的,只是合成事件和钩子函数的调用顺序在更新之前,导致在合成事件和钩子函数中没法立马拿到更新后的值,形成了所谓的“异步”,当然可以通过第二个参数 setState(partialState, callback) 中的callback拿到更新后的结果。
- setState 的批量更新优化也是建立在“异步”(合成事件、钩子函数)之上的,在原生事件和setTimeout 中不会批量更新,在“异步”中如果对同一个值进行多次setState,setState的批量更新策略会对其进行覆盖,取最后一次的执行,如果是同时setState多个不同的值,在更新时会对其进行合并批量更新。
- react17
- react18
- react19
关联问题
延伸阅读
- why setState asynchronous 官方对 setState 异步的解释
react 中的 key 有什么作用
答案
key 是 React 中用于标识列表项的特殊属性,通过 key 来比对列表元素的差异,实现高效的更新和重用。key 应该是每个列表项的唯一标识,通常使用列表项的 id 或其他唯一标识作为 key。
延伸阅读
- rules-of-keys 官方文档详细讲解 key 的使用规则
- reconciliation 官方文档讲解 React 如何使用 key
react 中如何引入样式
答案
| 方式 | 典型写法 | 适用场景 | 优缺点 |
|---|---|---|---|
| 外部 CSS 文件 | import './App.css' | 全局样式、简单项目 | 全局污染、样式冲突 |
| CSS Modules | import styles from './App.module.css',<div className={styles.box}> | 中大型项目、样式隔离 | 类名哈希隔离,易维护 |
| 内联样式 | <div style={{ color: 'red' }}> | 动态样式、简单场景 | 无伪类/媒体查询,权重高 |
| styled-components/emotion | <code>const Btn = styled.buttoncolor: red;</code> | 组件级样式、主题切换 | 支持 JS 逻辑、强大但需依赖 |
| Tailwind CSS | <div className="bg-blue-500"> | 原子化、快速开发 | 类名多,需配置 |
| 全局样式方案 | <style jsx global>、reset.css | 全局重置、第三方库 | 需注意作用域 |
代码示例
// 1. 外部 CSS
import './App.css'
export default () => <div className="box">外部样式</div>

// 2. CSS Modules
import styles from './App.module.css'
export default () => <div className={styles.box}>模块样式</div>

// 3. 内联样式
export default () => <div style={{ color: 'red' }}>内联样式</div>

// 4. styled-components
import styled from 'styled-components'
const Btn = styled.button`color: red;`
export default () => <Btn>样式组件</Btn>
推荐中大型项目优先用 CSS Modules 或 CSS-in-JS(如 styled-components),既能隔离作用域又便于维护。
延伸阅读